**I'm so excited to announce that I've started a youtube channel discussing everything home making. My channel name is Surviving As Mom. Check it out!! http://www.youtube.com/channel/UCmrj6ilyMI5G2hnraXRWpEQ
I love this blog. Had to share:
http://themattwalshblog.com/2013/10/09/youre-a-stay-at-home-mom-what-do-you-do-all-day/comment-page-18/#comment-39760
Thursday, October 10, 2013
Wednesday, October 2, 2013
No more stinky bath towels!
**I'm so excited to announce that I've started a youtube channel discussing everything home making. My channel name is Surviving As Mom. Check it out!! http://www.youtube.com/channel/UCmrj6ilyMI5G2hnraXRWpEQ
For over a year now, I've been plagued by foul smelling bath towels. No matter how often I washed them, or what tricks I used to clean them, the odor never went away. I've tried the recommendation all over the internet of washing them in only vinegar, baking soda and hot water, but no luck. I was just about to throw them all away, but today I tried one last thing. After lots of research, I found one last solution. *FYI- I have a high efficiency washer*
1. I took every (stinky) towel I owned and soaked them in my bathtub with about 4 cups of vinegar with the tub filled about half way with hot water. I left them there for about 4 hours, occasionally giving it a mix. I then squeezed as much water out as I could, then transferred them all to the washer. They still smelled at this point, but there was a film in the bath water so I had hope.
2. I filled both the soap and softener dispensers with vinegar, and half a cup of bleach in the bleach dispenser (even though I have dark colored towels). I also put a cup of baking soda directly in with the clothes. I set the washer to the hottest water temp and let it wash.
3. When that was done, I washed everything again. This time I used laundry detergent and put vinegar in the softener dispenser. Again, I set it to wash on the hottest temp.
To my surprise and relief, when I opened the door, there was no horrible odor. I pulled a towel out and stuck my face in it. Still no odor!! Just fresh, clean towels!! ...and the little bit of bleach didn't affect the colors at all!
I then transferred everything to the dryer, added a dryer sheet and set the temp to high. Done!
My towels were all saved from instant death!!! Hopefully this helps you too. :-)

Wednesday, September 18, 2013
Safety: Child ID bands
**I'm so excited to announce that I've started a youtube channel discussing everything home making. My channel name is Surviving As Mom. Check it out!! http://www.youtube.com/channel/UCmrj6ilyMI5G2hnraXRWpEQ
This past June I had to travel with my children for the first time. We went to St. Thomas for my sister's destination wedding. It was exciting, but I was very nervous about losing my children, especially in a foreign place. I'm also ashamed to admit that I did lose one of my boys one time when I was shopping in Target. It was for only about a minute, but it was terrifying.
The Target experience and the upcoming wedding led me to come up with a plan to allow my children to help themselves if (and when) they ever get lost again. I decided to get them ID bracelets. I wanted something inexpensive and durable. It also had to be waterproof, since they would be swimming a lot while on vacation. With the current craze of rubber message bracelets, I decided that was the way to go.
I went online and started searching. There was an overwhelming supply of choices. I needed a company that made bracelets in child sizes in small quantities (most sold only in bulk) and at low prices. I eventually found a site that worked. I won't name the site because I'm not 100% happy with them. The child's size is a little too big, but it got the job done. In the future, I'll find a different website.
I chose a bright color with debossed printing. I put their first and last name on one side and my cell phone number on the other side. I also ordered 2 bracelets per child, in case one got lost. Since the bracelets are a little large, they can easily slide off my boys' wrists, so while away on vacation, I had them wear the bracelets on their ankles. The bracelets weren't at all tight, but they didn't slide easily over their feet. When we're just going out to the store, they wear them on their wrist.

The next step is just as important as the bracelets. You MUST teach your child/children how to ask for help. They need to know how to save themselves if they are separated from you. Most children will just stand still and cry or worse, hide somewhere. That's not going to help anybody. That may even make them a target for predators.
I taught my children that if they are ever separated from me, to go to an adult for help. This can be tricky when trying to teach children about "good" or "bad" adults. I tell my children the obvious, go to a police officer, fireman, etc., but they are not always around. When I go to a store, I always show my children who works there. I try to teach them to recognize employees by uniforms, stations (cashier, security) or name tags. *I also tell them if they are not sure who to go to, always find a mom with kids to ask for help.* I think this is the most valuable thing I've learned! Chances are, a mom with children will not be a predator. Upon finding an adult for help, I taught them to say "I can't find my mommy" and show them the bracelet, which they know has their name and my number. I also told them that if they get lost together, they need to hold hands and stay together.
I was very proud when one day my son had to use my teachings one day and he did it perfectly! He wasn't really lost, because I could see him the whole time, but he couldn't see me. I didn't run to his rescue because I wanted to see what he would do. Here's what happened:
We went to a local fair which was near a park. Before we went home, my husband and I let the boys play in the park for a little while, which was crowded from the fair. We parked ourselves in a shady spot while the boys went off to play, always in our view. I always tell my boys where I'm sitting when I take them to the park, but only one heard me this time. The other ran off to play too quickly. After a few minutes, one my sons came looking for me, but didn't know where I was. He stood in the middle of the park, looking around. Within a few seconds of realizing he had no idea where I was, he very calmly turned to a nearby mother and told her "I can't find my mommy". At this point, my husband ran over to get him. I could not have been more proud at that moment! My 4 year old stayed perfectly calm and helped himself! He did exactly as I taught him!
It's funny because when I teach my children, I never know what is actually sticking or if they are even paying attention. It was really nice to know that he actually learned this important lesson. Now I am completely confident that if they ever get lost again that they will know exactly what to do.
Make sure you teach your children this important lesson as early as possible! It could really make all the difference in the world!
Monday, September 16, 2013
Cooking: Simple baking
**I'm so excited to announce that I've started a youtube channel discussing everything home making. My channel name is Surviving As Mom. Check it out!! http://www.youtube.com/channel/UCmrj6ilyMI5G2hnraXRWpEQ
I'm a little lazy when it comes to baking. I don't enjoy collecting all of the ingredients and measuring everything. That beings said, I found a lazy way to prepare for baking that I think you will find helpful. It definitely helps me!
I'm a little lazy when it comes to baking. I don't enjoy collecting all of the ingredients and measuring everything. That beings said, I found a lazy way to prepare for baking that I think you will find helpful. It definitely helps me!
Preparation only takes about 15 minutes and I usually make about 5 or 6 bags. First I pick a recipe that I make frequently. In this case, my family loves banana bread, so I will go with that.


First, I label all of the bags with what it makes (ex: "banana bread"). I write the wet ingredients to add, the baking instructions and the date. Line up the empty bags, and measure all of the dry ingredients and put them in each zip lock bag. Squeeze the air out and seal the bag. That's it!

I then roll up the bags and store them in a basket in a cabinet (or pantry). *I only have one bag left right now, but I intend to refill the basket with bags of banana bread, blueberry muffins, corn bread, etc.)

When it comes time to do some baking, I simply prepare the wet ingredients (usually eggs, milk, oil, fresh fruit, etc.), dump in the bag of dry ingredients and mix everything together. Follow the baking instructions and you have a quick and easy fresh baked dessert. It saves me lots of time and I am more likely to bake this way.
Enjoy!
Wednesday, September 11, 2013
Recipe: Roasted sweet potato bites
**I'm so excited to announce that I've started a youtube channel discussing everything home making. My channel name is Surviving As Mom. Check it out!! http://www.youtube.com/channel/UCmrj6ilyMI5G2hnraXRWpEQ
I made a video with this recipe. Check it out! https://youtu.be/peaPJUWJ0wo
I created this recipe to get my family to eat more sweet potatoes. This has become a favorite among my family and friends. Delicious and easy!!


I made a video with this recipe. Check it out! https://youtu.be/peaPJUWJ0wo
I created this recipe to get my family to eat more sweet potatoes. This has become a favorite among my family and friends. Delicious and easy!!
First I peel 2-3 raw sweet potatoes and chop them into bite size pieces (about 1 sq. inch).

Then I put them all in a large Zip Lock bag and add the following ingredients (all ingredients are estimate measurements):
-about 1/4 cup E.V. Olive oil (enough to coat everything)
-1 tsp thyme (fresh is best, but dry will work)
-about 1/4 tsp kosher salt
-2 heaping tablespoons light brown sugar


Toss everything together in the baggy until everything is mixed and spread evenly.
Spread the potatoes on a greased baking sheet.
*At this point, I sometimes add a light dusting of parmesan cheese.

Bake about 25 minutes at 375 degrees until soft and lightly toasted.
*If they look like the bottom is starting to burn, you can toss them a little to finish cooking.

You can finish them with extra salt and pepper to taste. Sometimes I toss a little butter in with them at this point. Not necessary, but butter always tastes a little better.
Enjoy!
The day my son became a puker
**I'm so excited to announce that I've started a youtube channel discussing everything home making. My channel name is Surviving As Mom. Check it out!! http://www.youtube.com/channel/UCmrj6ilyMI5G2hnraXRWpEQ
I had my then 1 year old twins pack in the car, on our way home from a doctor's appointment and suddenly L2 puked all over himself. It was the oddest thing. I didn't know what to make of it, so I cleaned him up the best I could and finished the drive home. A few weeks later, it happened again. I noticed it was happening more frequently, about every other car ride. Then it was every car ride that lasted more than 10 minutes. Finally I came to the conclusion that my poor baby had motion sickness.

I had my then 1 year old twins pack in the car, on our way home from a doctor's appointment and suddenly L2 puked all over himself. It was the oddest thing. I didn't know what to make of it, so I cleaned him up the best I could and finished the drive home. A few weeks later, it happened again. I noticed it was happening more frequently, about every other car ride. Then it was every car ride that lasted more than 10 minutes. Finally I came to the conclusion that my poor baby had motion sickness.
I called his doctor and asked what I could give L2 to help him deal with this since we went out to frequent appointments (specialists from their premature birth). I was very disappointed to learn that there was nothing I could give him at such a young age. He couldn't take anything until he was 2 years old. Hearing this made me feel sick.
This meant two things:
1. I'd have to keep him home as much as possible to avoid the situation altogether. This severely limited our social life (with friends and family) and our activities with the boys such as the zoo, aquarium, carnivals, etc.
2. When we absolutely had to drive anywhere, it meant that my poor baby had to feel sick to the point of vomiting on himself. It broke my heart.
When we had to drive somewhere, making him sick, it was always such a nightmare. We'd count down till he got sick. The aftermath was so disgusting. His clothes would be all wet and dirty, his carseat would get destroyed, with bits and pieces stuck in the cracks and crevices of the seat and belt clips. Then he and the car would stink of vomit. We eventually learned to bring a change of clothes and try to cover him with a blanket to "catch" the mess, but that wasn't very effective. One time when he vomited, it was so thick, he began to choke on it and we had to pull over and unstrap him as quickly as possible to get him out and beat his back to unblock his airway. It was horrible!
Eventually, he learned to communicate (sort of) by crying and pointing to his mouth. This gave us about 15 seconds to pull over and get him out before it happened. It wasn't always enough time. Then my poor baby learned to hold a bucket to catch his vomit. Around 2 years old, he knew when he was gonna be sick and how to catch it (mostly) in the bucket. Again, it broke my heart. It was also at this time that everything changed, finally.
At 2 years old, he was finally able to take something to control his car sickness. This is when the miracle drug Dramamine entered our lives. Finally we were free to roam again. We were no longer trapped at home, missing all the family events, summer activities and just the simplicity of going to the store as a family. It took a little time to learn how it worked, from how much advanced time we needed, to how long after the dose it lasted. Once in a while, he'd still get sick, but overall it was like night and day. Plus, he always has his trusty bucket right next to him in the car, just in case.
Other than the car sickness, we quickly learned that L2 was a puker in general. If he bounced around too much after he ate, he'd get sick. If he was crying too much, or if he fell too hard and got hurt, he'd get sick. Compared to his twin brother, who had the same activity level, he was definitely more sensitive. Can you imagine how hard it is to tell a young child not to play or jump around after eating so he doesn't get sick? Especially when he's trying to keep up with is brother. It's sad.
Now at 4 1/2 years old, we are still dealing with the motion sickness, but we seem to have a better handle on it. I know exactly how far I can drive without having to medicate him first. I also know when he needs to settle down after a meal to digest a little. He's even learned enough to go in the bathroom on his own when he feels sick. Usually he makes it. Sometimes he doesn't. Oh well. That's life with a puker.
I've learned that vinegar is the best thing to use to remove the vomit odor from fabrics and carpets. The vinegar stink disappears after about 30 minutes and the vomit stink goes with it. I also add a cup full to all of my laundry to prevent the odor from sticking to everything. For the car rides, I use a small beach pail. It fits nicely in the cup holder next to him and is big enough to catch the mess. I also keep a large bottle of water and a roll of paper towels in the car for rinsing the bucket afterwards and cleaning up any spills. By this age, he can also give me advanced warning when he's feeling sick so I have more time to prepare and try to prevent it.
The doctor said he'll outgrow this, but I still get motion sickness, so I don't expect it to pass for him either. The few times we forget to medicate him before a trip, he knows enough to remind us. At least we all know how to deal with it now.

Monday, September 9, 2013
Home Improvements: Front Yard Landscaping redo
**I'm so excited to announce that I've started a youtube channel discussing everything home making. My channel name is Surviving As Mom. Check it out!! http://www.youtube.com/channel/UCmrj6ilyMI5G2hnraXRWpEQ
So I've lived in this house for about 6 years now and I've made multiple failed attempts to improve my curb appeal on a minimal budget. To be honest, it is a learning process that I think I may have finally gotten the hang of. Realistically, the whole front needs a major overhaul, including new siding on the house, new pavers, new driveway, and the removal of a huge tree. However, until I can come up with multiple tens of thousands of dollars for that, I will just have to be happy with my modest fix of moving around some existing plants.


This is the other side by the butterfly bush. Near the house is unhealthy azaleas ...and lots of weeds.


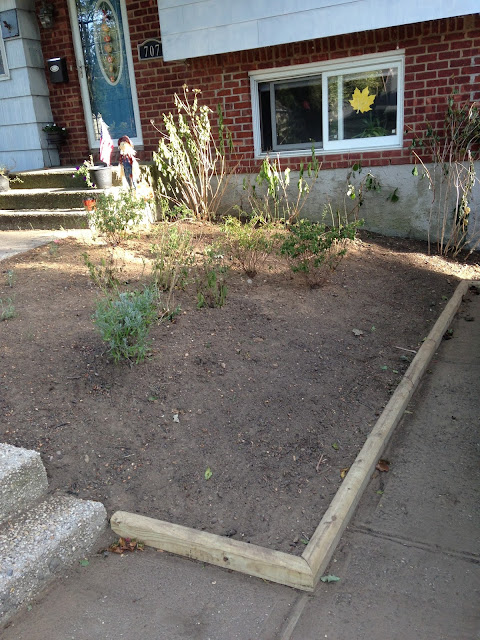


So I've lived in this house for about 6 years now and I've made multiple failed attempts to improve my curb appeal on a minimal budget. To be honest, it is a learning process that I think I may have finally gotten the hang of. Realistically, the whole front needs a major overhaul, including new siding on the house, new pavers, new driveway, and the removal of a huge tree. However, until I can come up with multiple tens of thousands of dollars for that, I will just have to be happy with my modest fix of moving around some existing plants.
I started by digging out the old rotted wooden edger and leaving a trench for the replacement. My husband did the replacement last since I wanted to start before he was ready to do the work. I started by digging everything out and splitting bulbs and root balls that needed to be separated. This included about 60 daffodil bulbs, about 30 lily bulbs, some bleeding heart roots, a bunch of astilbe bulbs and various plants and shrubs.
This left me with a clean slate and a nice selection of clean plants and bulbs to use as I needed. After everything was out, I had my husband use a rake to remove the top layer of tree nuts, mulch, leaves, twigs, weeds, and other junk that didn't belong. He then tilled the whole thing to loosen and aerate the soil for me in preparation for planting. After this, he used the rake again to smooth and level the soil for me.
Then it was my turn again. I started by laying everything out in the place that I wanted it, without actually burying it. This gave me the visual affect while allowing me to make easy adjustment before I committed to burying everything. I laid everything in a fashion that would allow a laying effect keeping in mind the time of year that everything will bloom. Shade and sun exposure are also very important especially since my house is North facing so there is only shade that comes about 6 feet from my house. The rest is partial sunlight.
When I was satisfied with the layout, I started digging. A lot! First, I dug a trench and laid most of the daffodil bulbs along a section of the house with the bleeding heart roots just in front of that. I also laid some daffodils in a half circle around the base of the tree. I planted the astilbe bulbs, azaleas, salvias, phlox, mums and hydrangeas. I also planted some lavender, thyme, sage and rosemary that I propagated from existing plants. These are gonna smell amazing next year!!
In addition to this, I moved around a few of the larger items on the other side of the steps for better spacing and placement. I moved the far hydrangea closer to the steps and moved the butterfly bush closer to the house. I relocated the other butterfly bush, all the lily bulbs and the remaining hydrangeas to the back yard.
I still need to get tulips to plant along the walkway, but they aren't available in stores yet. I also want to add a few more mums by the tree. The last thing I need to do is mulch everything, but that will probably come next month.
Before (this is embarrassing):
This is by the tree I want to remove. This is a mess of lilies and a mum. I replaced these with mums.

This is the butterfly bush in the middle surrounded by lilies ...and weeds

This is the small patch in front of the driveway with weeds and wilted bleeding hearts. Right now this looks like a bare patch of dirt, but in the spring it will have daffodils in the back with the bleeding hearts in front.


This is my steps (and baby). I have to replant the potted plants and bleach the concrete. I also need a new "welcome" mat.

This is my hydrangeas on the other side of the steps. There is an unhealthy azalea right next to the steps. I removed the azalea and moved the far hydrangea into that space.

I moved this butterfly bush closer to the house in the place of the far hydrangea.

*Before you see the after, keep in mind that everything is still shocked from the move so it still looks droopy. It takes a few weeks to months for everything to settle in. Plus, it's the fall so everything is in the process of going dormant. I still need to add mulch to everything too. I will post final "after"pics in the spring when everything has settled and bloomed. I can't wait for that!
Along the walkway and edger, I planted alternating lavender and thyme. This is going to smell amazing!

I still need to add more mums here.

Everything looks so much cleaner with the new edger.

It looks rough now, but it'll be much nicer in the spring.

*Better pictures to come in the spring!! Stay tuned!
Subscribe to:
Posts (Atom)