Showing posts with label cleaning. Show all posts

Saturday, August 31, 2013

Cleaning: How to Clean your Glass Top Stove

**I'm so excited to announce that I've started a youtube channel discussing everything home making. My channel name is Surviving As Mom.  Check it out!! http://www.youtube.com/channel/UCz2xg_4pON1go7UK2ziD5JQ?sub_confirmation=1

Cleaning a glass top stove is not as scary or difficult as many people think.  In my experience, I found that you do not need the special glass top cleaning agent with the special scrubber sponge that the manufacturer claims is necessary.  (*Disclaimer- Not following the manufacturer's directions may damage your cooktop.)  Again, this is my own experience that no damage has occurred from my cleaning practices.  Any scratches that I have on the surface are from my pots and pans during cooking.  All I use is a regular dish sponge with a scrubber side and Dawn dish soap.  I use this method to clean my stove every time.  Even with the dirtiest messes, including grease splatter from frying, your stove will be clean and shiny.


Step 1:
Wipe all debris off the surface.

*If you have burnt on rings around each burner, you can use a scraper (flat razor tool) to scrape everything up first.  I usually do this once-twice a year.

Step 2:
Using a very wet, soapy sponge, wring out soapy water onto the surface of the stove.


Step 3:
Use the scrubber side of the same sponge to spread the soap on the entire surface and scrub in a circular motion until everything feels nice and smooth.


Step 4:
Either use the same sponge or a new soap free sponge to wipe up suds, rinsing between each wipe.  The purpose of this is to clean the soap off the stove.


Step 5:
Use a dry paper towel to wipe up any excess water and soap so the surface is nice and dry.  If you have any ridges or seams (as I do around the edge), be sure to use your fingernail to get the paper towel in the ridge to get out all residue and soap.


Done!!  That's it!


Friday, August 30, 2013

Cleaning: Bathroom (step by step)

**I'm so excited to announce that I've started a youtube channel discussing everything home making. My channel name is Surviving As Mom.  Check it out!! http://www.youtube.com/channel/UCmrj6ilyMI5G2hnraXRWpEQ

We all have the wonderful task of cleaning the bathroom.  Most of us don't like it!  However, as a family of 5, to which I am the only female, cleaning my two bathrooms often is a requirement.

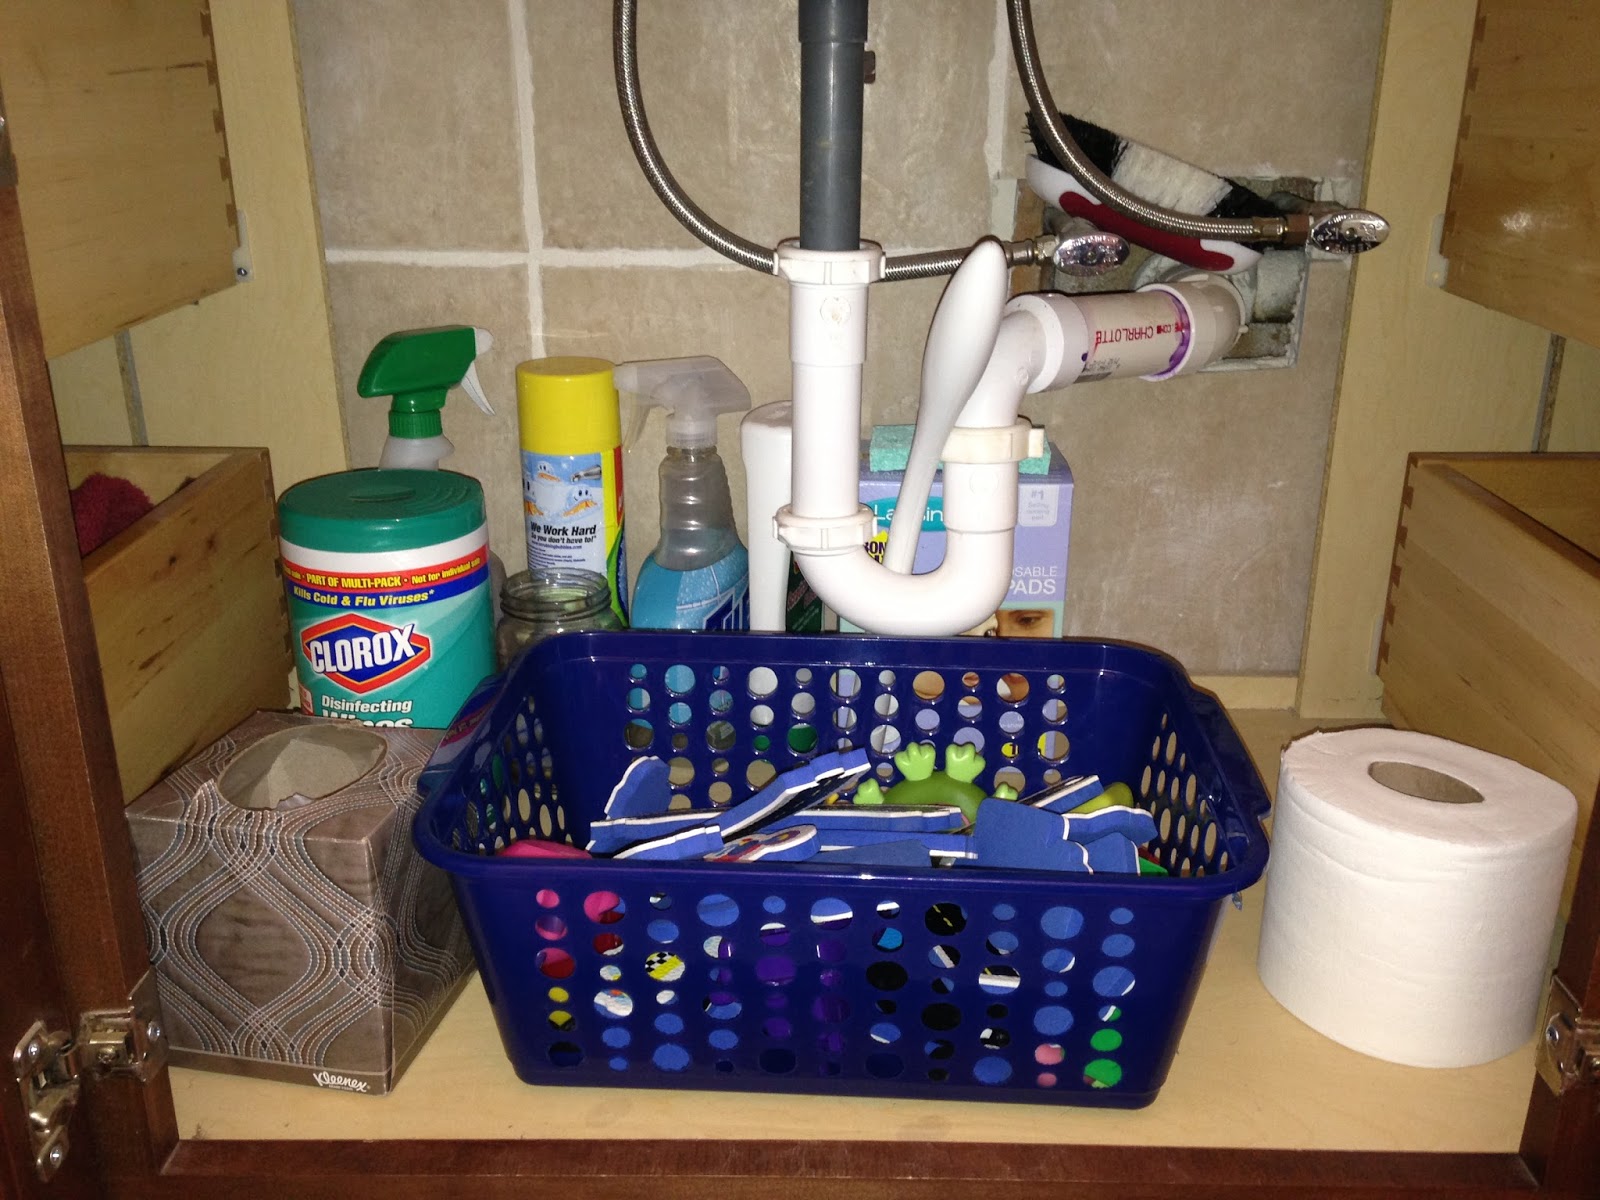
The pics in this blog are from my main bathroom that is used by everyone including the kids.  It is possible to have a beautiful, clean bathroom, even with preschoolers.  Their bath toys are hidden under the sink in a plastic basket purchased from the dollar store.

My most used chemicals and tools for this job are: Peroxide, Windex, Clorox Bleach wipes, Vinegar, Clorox Toilet Wand, a soap dispensing scrubber (filled with 50/50 Dawn Soap and vinegar), Febreeze and the Libman Freedom Mop with Pinesol.

You can refer to my other blog:
Cleaner Cleaning: Vinegar, peroxide and baking soda


After years of practice, I think I've finally perfected my routine.  Here it is:

1. Cleaning the vanity/sink:
-First I clean all excess items off of the counter.  This usually includes hair accessories, brush, bath toys, and anything else that can usually accumulate.
-I use a Clorox Bleach wipe to wipe the faucet,  handles, counter top and the items I keep on the counter (Q-tip holder, toothbrush holders, wet wipe box).
-I use the Clorox Toilet wand with a fresh cleaning bad to scrub the sink.  *When you are done, don't throw it away.  You will use the same pad to clean the toilet.


2. Clean the toilet:
-First I use a Clorox Bleach wipes to clean all the surfaces of the toilet tank, including the flush handle.
-Next I clean both sides of the toilet lid and seat, paying careful attention to the cracks and seams.  I then wipe of the toilet rim, including the odd space between the seat and tank.
-Use a clean wipe to clean the entire outside of the toilet (below the rim).  This includes the structures on the backside under the toilet and the joint where the toilet meets the floor.
-Lastly, I use the Clorox Toilet wand (with the same pad I used to clean the sink) and clean the inside of the toilet.  Don't forget to clean under the rim where the water comes from.  Discard the pad in the trash when done.  Do Not flush it!


3. Clean the bathtub:
I'll admit that I save this step for when I'm actually in the shower.  For me, it's just easier on my back than leaning in an awkward position trying to scrub everything.  For general cleaning, I use my soap dispensing scrubber filled with a 50/50 mixture of Dawn Dish soap and vinegar.  I make sure to scrub the walls, window sill, plumbing fixtures, bathtub and rim of tub.  Make sure to pay careful attention to tight corners and angles.  For the stubborn, hard to clean "ring around the tub", I use the Mr. Clean Magic Eraser after I've scrubbed and disinfected everything with my soap dispensing scrubber.

Back to the regular cleaning routine:
-I use a clean Clorox Bleach wipe to wipe the edges and outside of the bathtub, including the seam where it meets the floor.
-I finish by spraying the shower curtain with Febreeze to freshen it up a little.


4. Extra stuff:
-At this point, I clean my mirror with Windex, tidy up my towels and magazines, and empty the trash can.  I also like to use a Clorox Bleach wipe to clean all door knobs, light fixtures, light switches, vanity drawer handles, picture frames, and ledges.

5. The floor:
After I've finished everything else, I move on to the floor.  This is done in multiple steps.
-First I take everything off the floor and move them into the hallway.
-Vacuum the entire floor, using the hose and nozzle for getting behind the toilet, in corners and under radiator.  Yes, I vacuum my bathroom.  I find it easier and more thorough than sweeping.
-Next, I spray the base of toilet, floor, and walls under, around and behind the toilet with Vinegar and peroxide.  Use a generous amount and make sure to thoroughly soak the grout lines.  Let it sit a few minutes.  Wipe it up with a used towel or lots of paper towels.
-The last thing I do is use my Libman Freedom mop with Pinesol to wash the floor.  Don't forget the area around the toilet.

*Once you put the trash can and (in my case) step stool and magazine holder back in place, you are done!!  This takes me about 20 minutes to complete.  Nice and easy!

*Additional Bits and Pieces*

-To neatly store shopping bags for the trash can, I keep them in an empty tissue box under the sink.  I have one in each bathroom.


-To neatly and stylishly store magazines and other reading materials, I use a rectangular planter that matches my decor.


-To neatly and easily store Clorox wand refill pads, I keep them in an empty glass jar.  This also allows for hands free dispensing.  I keep one jar with a wand in each bathroom.


-I try to keep the space under my sink as organized and clutter free as possible.  I try to keep cleaning products I use regularly (though this picture has a few extras).  I also try to keep the toilet paper nicely stocked (again, not so much in this pic).


Hopefully this blog has helped to make your bathroom neat and clean, and you learned that it's not that hard to do.

Happy Cleaning!!

Wednesday, August 28, 2013

Cleaner Cleaning: Vinegar, peroxide and baking soda

**I'm so excited to announce that I've started a youtube channel discussing everything home making. My channel name is Surviving As Mom.  Check it out!! http://www.youtube.com/channel/UCmrj6ilyMI5G2hnraXRWpEQ

I'm not at all a "green" person by any means.  However, in recent months, I've come to realize that many of the harsh cleaning chemicals that I've used for so many years aren't all necessary.  Ok, nothing beats bleaching a dirty mess, but there are healthier alternatives for everyday messes.  Unlike "green" cleaners, these three actually disinfect, which is a priority to me.  I'm not a "germaphobe", but I definitely am very aware of common bacteria and viruses.


Vinegar!  Peroxide!  Baking soda!

These are my new best friends!  I always have these items in my home in large quantities (always purchased at Costco for next to nothing).  For example, two 32oz bottles of peroxide cost me less than $5 compared to a 26oz spray bottle of commercial cleaner for almost $6.

Vinegar, peroxide and baking soda, used each on their own, or in various combinations together work as effectively at cleaning many messes and they are much safer to the environment and our bodies.  There is a ton of info on the web on how to clean with these three, so start looking and be enlightened!

Vinegar and baking soda: 
I always add a cup of each to my laundry to boost the cleaning power and aid with odor removal.

I also use these two for cleaning my kitchen sink.  After I rinse the sink clean, I spray it with vinegar, then sprinkle it with baking soda.  After is sits about a minute, I scrub with the abrasive side of the sponge.  It gets all the grease, grime and funk out and leaves my stainless steel sink looking pretty good (for a 50 year old sink).  It is also good for cleaning and deodorizing the drain.  Put about 2 tbsps in the drain and pour about half a cup of vinegar inside.  You will probably see it foam up.  This is good!  Let it sit for a few minutes then just run the water to wash it down.

This combination can also be used for cleaning tile grout.

Peroxide:
I often use this in place of bleach wipes.  I especially love it to clean and disinfect my son's high chair tray since it doesn't leave a harmful residue of chemicals for him to eat off of.  I also use it to clean and disinfect my kitchen countertops after handling raw meats.

You can also use it to disinfect fruits and veggies and help them to last longer.  Vinegar will work for this purpose too.  I'll either spray peroxide directly on the fruits and veggies or soak them in water with vinegar mixed in.  Just be sure to rinse them all before eating.

I also love to use peroxide and vinegar combined in my bathroom around the toilet.  I have all boys, so as you can imagine, it can get messy and quite smelly around the toilet.  After scrubbing daily with commercial chemicals, I could NOT get rid of the odor so I did some research.  If you spray peroxide, then vinegar and let them sit for a few minutes, they will neutralize the odor.  No more urine stink in my bathroom!!


I still use commercial cleaning products, especially bleach wipes for some jobs, but its nice to know that there are healthy alternatives available that actually work.

Here are some links I found useful:
51-fantastic-uses-for-baking-soda
using Peroxide
cleaning with peroxide
25-ways-to-clean-with-vinegar

Tuesday, August 27, 2013

Cleaning Schedule

**I'm so excited to announce that I've started a youtube channel discussing everything home making. My channel name is Surviving As Mom.  Check it out!! http://www.youtube.com/channel/UCmrj6ilyMI5G2hnraXRWpEQ

I love a clean house!  However, like most people in the world, I hate the actual process of cleaning.  I always seemed to be drowning in my to-do list when it comes to cleaning and organizing, so I decided to do some research.  I found that many moms who seem to have their "stuff" together operate on a schedule.  I decided to try it and found that it worked very well.  Not only did it keep me on track, but it made the job easier since it broke everything down each day.  This allows me to spend 15-20 minutes a day maintaining my home in an acceptable condition, rather than spending an entire day cleaning the whole house only to find it a disaster again a few days later.  

I compared many different types of cleaning schedules and took bits and pieces from each that would work for me.  I then sat down and wrote my own schedule.  This is what I came up with.  It is posted on my refrigerator so I can see it every time I go into the kitchen.  


I'll admit, there have been plenty of times when I'd fall of following the schedule, even for weeks at a time.  That's ok.  This schedule has at least taught me that I can spend a short time each day getting my home in an acceptable condition.  I've also learned that a little each day is much easier (and nicer looking) than all at once.  

Feel free to copy my schedule and taylor it to your needs.

Happy Cleaning!!

*I've also attached the link to this document: Cleaning Schedule